Connecting to a firewalled computer via an SSH tunnel
author: Brorsan (peter@brorsan.com)This document is intended to be a step-by-step guide showing you how a simple SSH tunnel can be used to acces a firewalled machine on a private network, without the hassle of portforwarding. In this example, the service that will be accessed is Remote Desktop running on a Windows XP installation on a private network behind a firewall.
Software used
SSH client:The excellent, totally free, program PuTTY.
SSH server:
The Linux router obviously needs to have an SSH-service installed. In this example the free OpenSSH software is used. Though, any SSH server with support for the SSH2 protocol should suffice.
Example setup
The guide will use this very common setup:
Workstation
This is the computer we are using as our workstation, and we'll be using to access the firewalled computer. In this example it has the IP address 1.2.3.4 and have a direct broadband connection to the internet.
Linux server
This is a Linux machine with the soul purpose of acting as a router for the machines on the private network. It has no type of portforwarding setup, just basic routing/masquerading services for the firewalled machine(s). It has two network cards, the first card (eth0) is directly connected to the internet and has the IP address 5.6.7.8. The second card (eth1) is connected to the LAN and has the reserverd IP address 192.168.0.1. This is a basic and very common setup. And of course, it must have the ssh service installed and running.
Firewalled computer
This is the machine that you wish to connect to. In this example it has a Windows XP installation and the service we wish to access is with the RD (Remote Desktop) service which runs on port 3389/tcp. This machine has the reserved IP address 192.168.0.2.
How does the tunnel work?
I will try to make a simple explanation :) First of all, you start an SSH session between your workstation and the Linux router. If the SSH client is configured correctly (which we will do below), an encrypted "tunnel" automatically opens at the same time, from a chosen port on your workstation, to the Linux router, and on to a chosen port on the target host (the firewalled computer). All this is configured in the SSH client. Everything sent via the tunnel will end up at the firewalled computer. The data that is sent will be encrypted, but only between the workstation and the Linux router, not between the Linux router and the firewalled computer. To send data via the SSH tunnel, you need to make a connection to the configured port on your workstation. This is done by connecting to localhost:port.Step 1: Configuring PuTTY
Now it's time to configure PuTTY to match our setup above.When PuTTY is started, this screen will appear:

Go to the Connection -> SSH -> Tunnels tab and the windows should look like this:

Here we need to fill in some information:
Source port: This is the port that will be used on the workstation for the localhost connection mentioned earlier. Any avalible port may be chosen (in the range 0-65535), in this case we choose port 999. Be careful not to choose a port that is already being used by services running in the workstation.
Destination: This is the IP and port of the final destination host, i.e. the firewalled workstation. In our case this is 192.168.0.2:3389
Now click 'add' and the window should look like this:

Now, click ont the SSH tab (Connection -> SSH) and under Prefered SSH protocol version, choose 2. You migh also wish to check the Enable compression box to speed the connection up. The configuration window should look like this:

Now, go to the sessions tab (at the top) and fill in the Linux router's external IP address in the Host Name (or IP address) field. In our example the external IP is 5.6.7.8. Then select the SSH button beneath (default is Telnet). If you wish to save these settings for future use, you can fill out a name for the session in the saved sessions field and click the save button. It willl now be available the next time PuTTY is loaded. After you push the save button you should have a window that looks like this:

The configuration of PuTTY is now finished!
Step 2: Making the connection
To open the SSH tunnel, you first have to make a normal SSH connection to the Linux router, using the settings we just made. Just click the Open button at the bottom of the sessions tab to establish the connection, and login with your normal Linux account.It should now be looking something like this:

The tunnel is open for as long as this session is active, so just leave it opened as long as you want the tunnel to be open. Now itÇs time to use the tunnel. Since we wanted to access the Remote Desktop service running on the firewalled machine, we start our Remote Desktop client which we find under START -> Programs -> Accesories -> Communications -> Remote Desktop Connection. Now, to access the tunnel, we must connect to our own workstation, since this is where the tunnel "starts". Simply enter localhost:999 (999 being the port we selected). Like this:

Now click the connect button and you should be connected to the firewalled machines Remote Desktop service! That's it!
NOTE! If you get this error message:

You can fix it by copying the files c:\windows\system32\mstsc.exe and c:\windows\system32\mstscax.dll to another folder. Then right-click the mstsc.exe file and and choose Properties. Select the Compability tab and select to run it in compability for Windows 98/Windows Me. Like this:
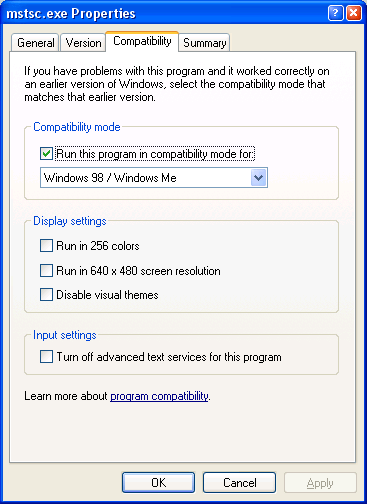
Now, double-click the mstsc.exe file and use it for the loalhost connection like above. The reason for this error message is simply a security function in the RD-client, it doesn't allow connections to the same computer it is running on. This has nothing to do with the tunneling, it is purley a limitation/security function in Microsofts Remote Desktop client!